
C program
1. How to install Turbo C++?
| Step 1 | Download Turbo C++ 3.2 from here DOWNLOAD TURBO C++ |
| Step 2 | If any previous version of “Turbo C++” is installed on your computer, then first of all uninstall that. |
| Step 3 | Extract the downloaded “Turbo C++ 3.2.zip” file. |
| Step 4 | Run the “setup.exe” file. |
| Step 5 | Follow the setup instructions. |
| Step 6 | If any error occurs, please check the solution of common Turbo C++ issues here. |
2. How to use Turbo C++
- Double-click on the “Turbo C++” shortcut link on the desktop.

- If you want to run Turbo C++ on full screen simply click on the button “Start Turbo C++

- “OR” If you do not want full-screen mode uncheck the “Full-screen mode” check box or Press F5 button

3. System Requirement
| Operating System | Pre-Requirement |
| Windows 11, 10, 8.1 and 8 | No Pre-Requirement |
| Windows 7, Vista, and XP | .NET 4.5 Framework Required |
to know some of the most used and the most important shortcuts used in Turbo C++.
Turbo C++ Keyboard Shortcuts Keys:
| S No. | Shortcut keys | Action |
|---|---|---|
| 1. | F1 | For Help |
| 2. | F2 | Save |
| 3. | F3 | Open |
| 4. | F4 | Go to cursor |
| 5. | F5 | Zoom |
| 6. | F6 | Next |
| 7. | F7 | Trace into |
| 8. | F8 | Step over |
| 9. | F9 | Make |
| 10. | F10 | Menu |
| 11. | Alt + F1 | Go to the previous Topic |
| 12. | Alt + F3 | Close the opened file |
| 13. | Alt + F4 | Inspect |
| 14. | Alt + F5 | Open user screen/output screen |
| 15. | Alt + F7 | Go to the previous Error |
| 16. | Alt + F8 | Go to the next Error |
| 17. | Alt + F9 | Compile |
| 18. | Alt + 0 | Open a list of all available files |
| 19. | Alt + C | Open Compile menu option |
| 20. | Alt + D | Open Debug menu option |
| 21. | Alt + E | Open the Edit menu option |
| 22. | Alt + F | Open File menu option |
| 23. | Alt + H | Open the Help menu option |
| 24. | Alt + O | Open the option menu |
| 25. | Alt + P | Open Project menu option |
| 26. | Alt + R | Open Run menu option |
| 27. | Alt + S | Open Search menu option |
| 28. | Alt + W | Open Window menu option |
| 29. | Alt + X | Quit |
| 30. | Alt + Bksp | Undo |
| 31. | Alt + Bksp + Shift | Redo |
| 32. | Alt + Enter | Minimize or Maximize |
| 33. | Ctrl + Delete | Delete selected code |
| 34. | Ctrl + F1 | Topic Search |
| 35. | Ctrl + F2 | Reset Opened Program |
| 36. | Ctrl + F3 | Call Stack |
| 37. | Ctrl + F4 | Modify/Evaluate Expression |
| 38. | Ctrl + F5 | Size/Move |
| 39. | Ctrl + F7 | Add Watch |
| 40. | Ctrl + F8 | Toggle between breakpoints |
| 41. | Ctrl + F9 ‘or’ Alt + R + Enter | Run code |
| 42. | Ctrl + L | Search selected String |
| 43. | Ctrl + N | Add New Line |
| 44. | Ctrl + S | Save |
| 45. | Ctrl + Y | Delete Line |
| 46. | Ctrl + Ins | Copy |
| 47. | Ctrl + K + B | Select Starting Points |
| 48. | Ctrl + K + K | Select Ending Points |
| 49. | Ctrl + K + H | Hide Grey line of Selection |
| 50. | Windows | Exit |
| 51. | Shift + Delete | Cut |
| 52. | Shift + Ins ‘or’ Ctrl + K + C | Paste |
| 53. | Shift + F1 | Open Turbo Help Index |
How to run a C program in Visual Studio Code?
A visual studio code is a lightweight software application with a powerful source code editor that runs on the desktop. It is a free source code editor developed by Microsoft for Windows, Mac OS and Linux. It is a software editor that has a rich extension of various languages like C++, C+, C, Java, Python, PHP, Go, etc. and runtime language extensions such as .NET and Unity. It is easy to edit, build, syntax highlighting, snippets, code refactoring and debugging. In Visual Studio code, we can change the application’s background theme, and keyboard shortcuts set on our preferences, install an extension and add additional functionality.
Prerequisites for running a C program in Visual Studio Code
- We should have a basic knowledge of C programming.
- The Visual Studio Code Editor must be installed in the system.
Download
- Download the C/C++ Extension. It is an extension provided by Microsoft that supports Visual Studio code. It helps in IntelliSense, debugging and code browsing of the programming code in the visual studio.
- Download the C/C++ compilers. There are some popular compilers are:
- GCC on Linux
- GCC via Mingw-w64 on Windows
- Microsoft C++ compiler on Windows
- Clang for XCode on MacOS
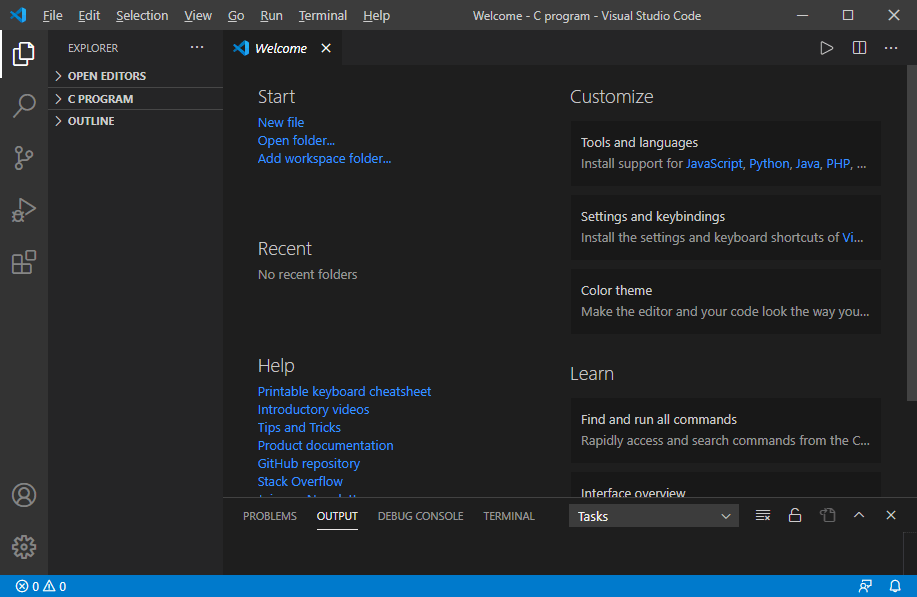
We have already installed the Visual Studio Code in our system. The user interface of VS code looks like the following:
Download & Install the C/C++ Extension
1. We need to click on the extension button that displays a sidebar for downloading and installing the C/C++ extension in the Visual Studio code. In the sidebar, type C Extension.

2. After that, click on the C/C++
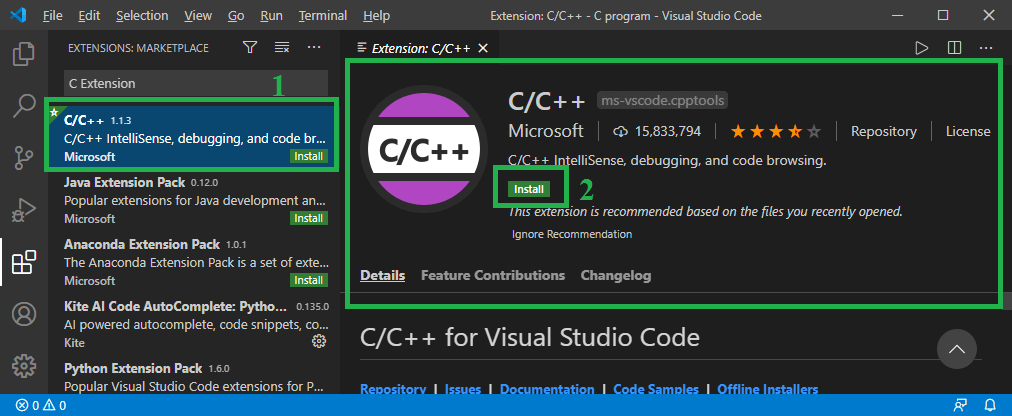
In this image, click on the Install button to install the C/C++ extension.
3. After clicking the Install button, it shows the below image.
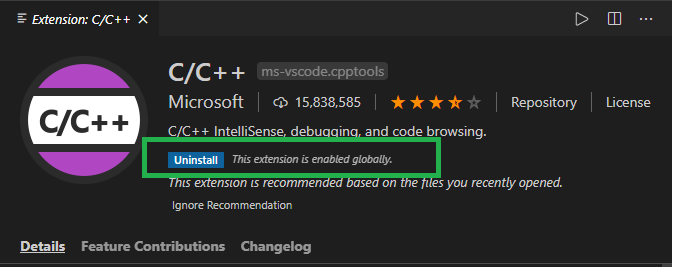
In this image, we can see it shows the Uninstall button which means the C/C++ extension has been successfully downloaded in the Visual Studio code.
Download and Install Compiler Extension
A MinGW is an advanced GCC compiler software used to compile and execute code. It is software that supports only the Windows operating system.
Download the MinGW-w64 Compiler
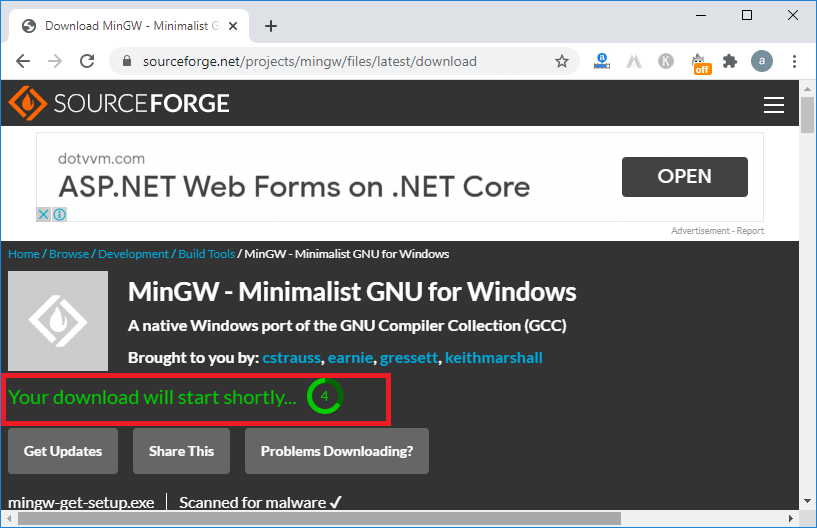
1. Go to the https://sourceforge.net/projects/mingw We land on the following page.
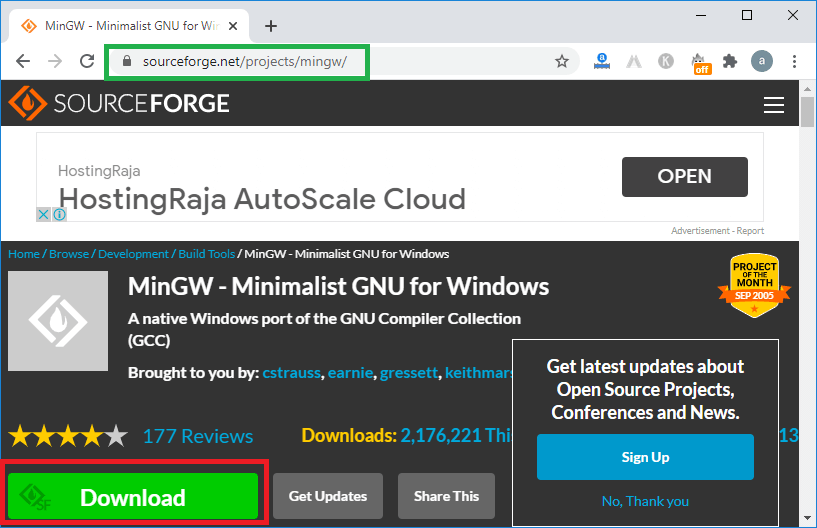
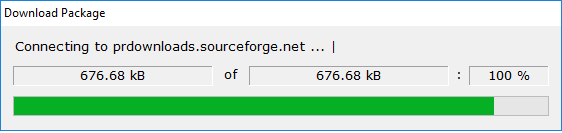
2. After that, click on the Download button, and then it starts the downloading of the MinGW GCC compiler, as we can see in the image below.
3. MinGW software has been successfully downloaded into the system.
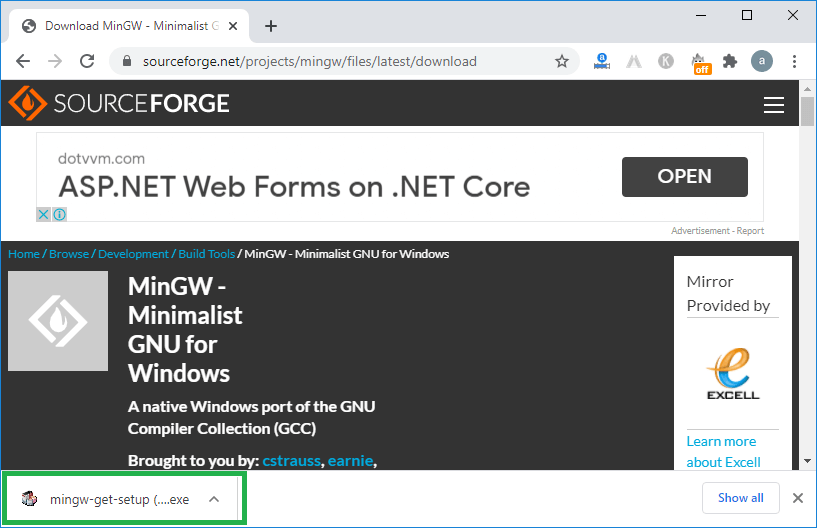
4. Now we double-click on the MinGW set-up to install the compiler.
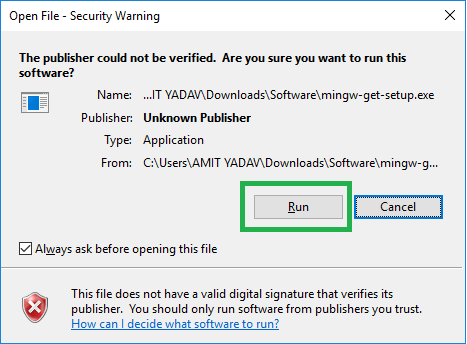
As we can see, it shows that it is a harmful file click on the Run button to proceed with installing the setup.
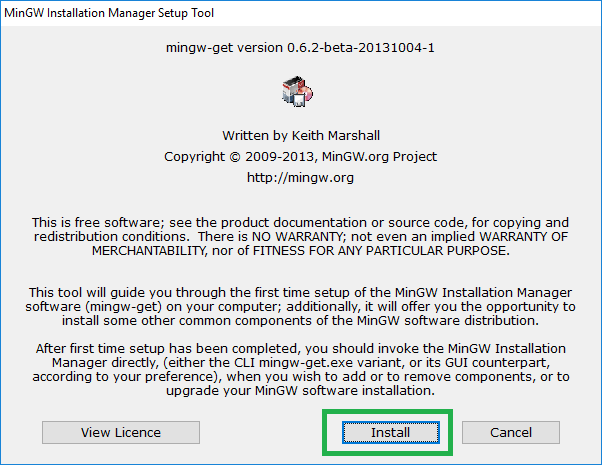
5. Click on the Install
6. Set it defaults, or we can change the storage location of the setup. After that, click on the Continue
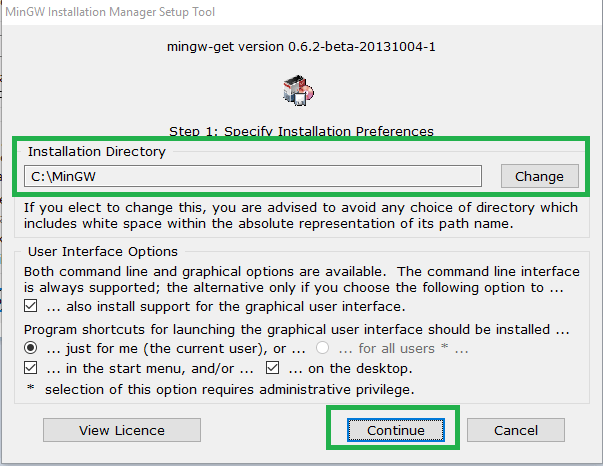
7. Clicking the continue button shows step 2 of MinGW Installation Manager.
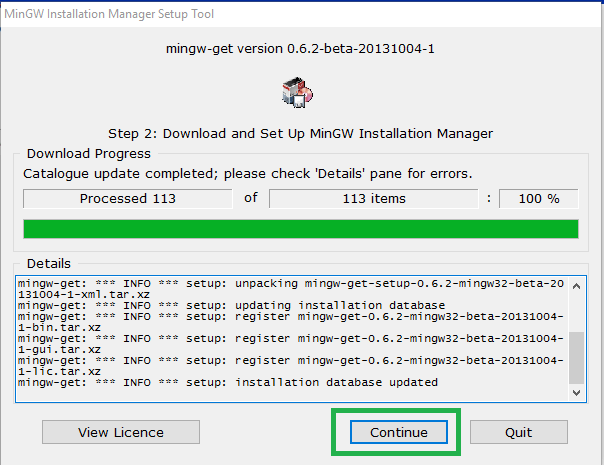
8. As we click on Continue, it shows the below image. In the MinGW Installation Manager, we need to check the Mingw32-base package and Ming32-gcc-g++ package to run and compile the C/ C++ program in the Visual Studio code editor.
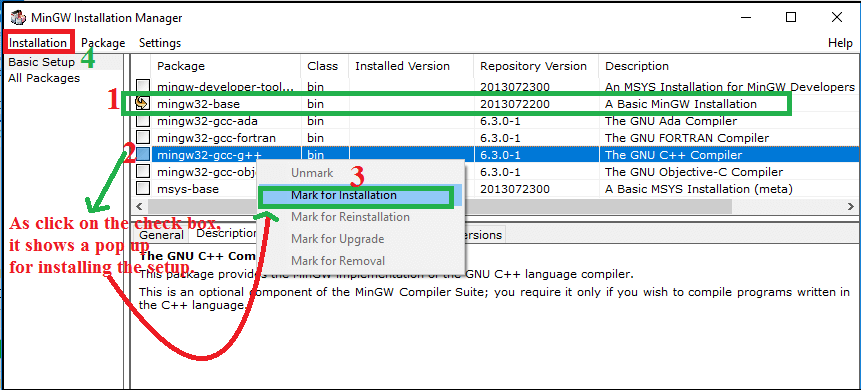
9. After selecting the checkbox, click on the Installation tab (at the top left corner of the dialogue box).
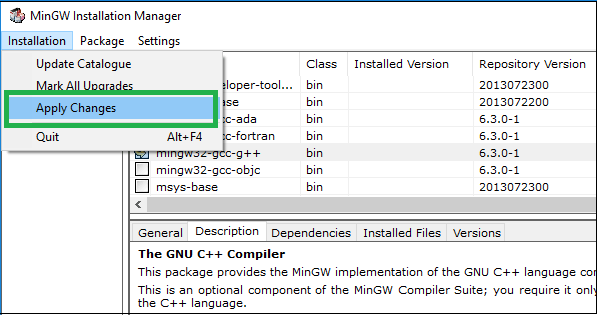
Here we click on Apply Changes to set the package’s installation in MinGW, as given below.

10. After clicking on the Apply button, it shows the below image.
11. After downloading the packages, it shows the installation process of the package, as shown below.
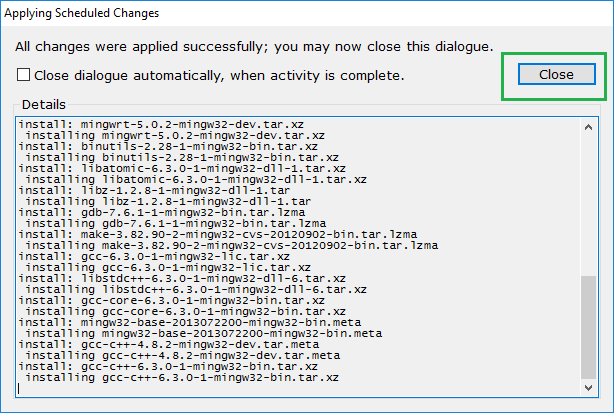
Here we can see all the changes have been successfully applied and then click on the Close button.
Set the Environment Path for the MinGW Set Up
After downloading and installing the MinGW compiler, we set the environment path to include the C/C++ compiler directory.
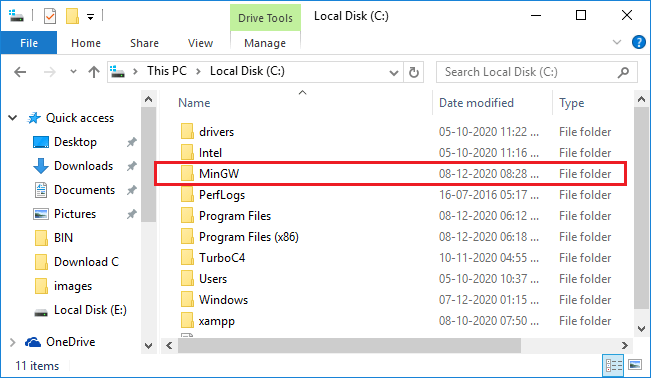
1. Go to the installation directory of the MinGW Set Up. Here we installed the setup on the C drive, as shown below.
2. Double-click on the MinGW folder. It shows the below image.
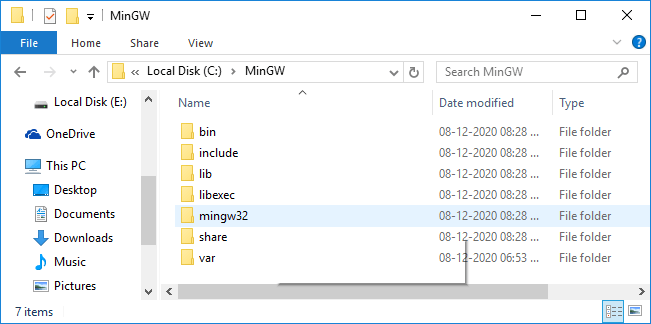
3. After that, click on the bin folder and then copy the directory path, as shown below.
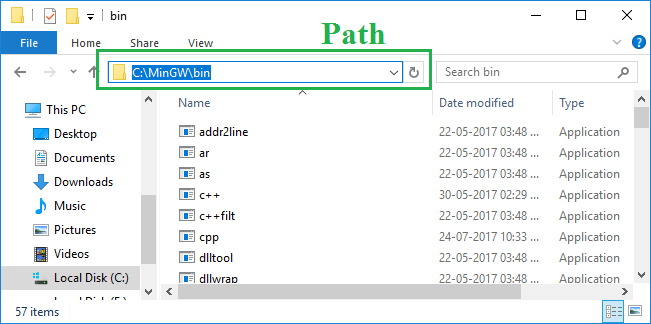
Here is the path of the MinGW folder path: C:\MinGW\bin
4. After copying the directory path, go to This PC -> Right Click on This PC -> Select/ Click on the Properties. It shows the below image.
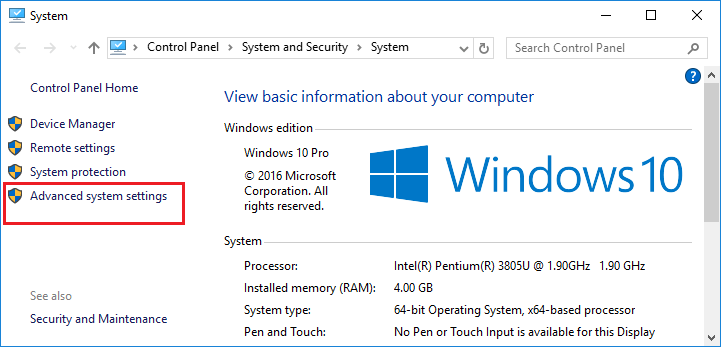
5. After that, click on the Advanced system settings to display a popup box of System Properties, as shown below.
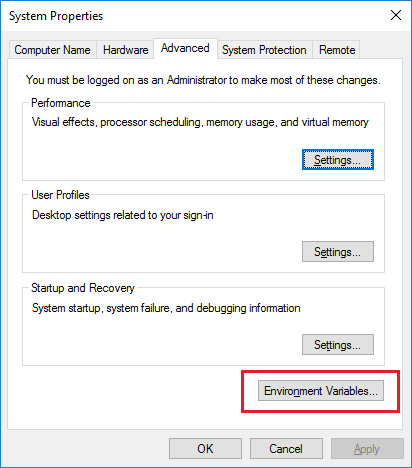
6. Click on the Environment Variables to set the directory path, as shown below.
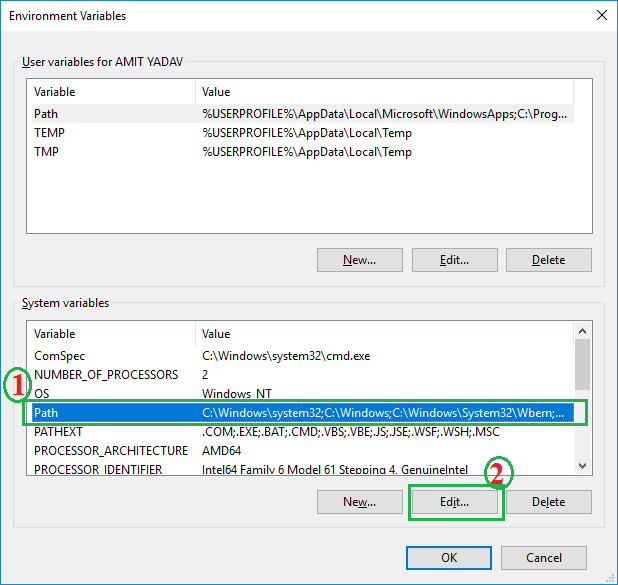
First, we have to click on the System Variables Path and then click on the Edit button, as shown in the above image.
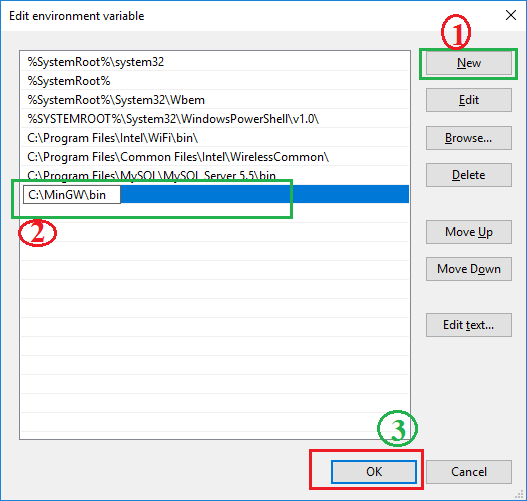
7. As we click on the Edit button, it shows a popup window to set a new path, as shown below.
In the above image, first, we click on the New button and then paste the C:\MinGW\bin path; after that, click the OK button.
8. Similarly, click the OK button on the Environment Variables and System Properties.
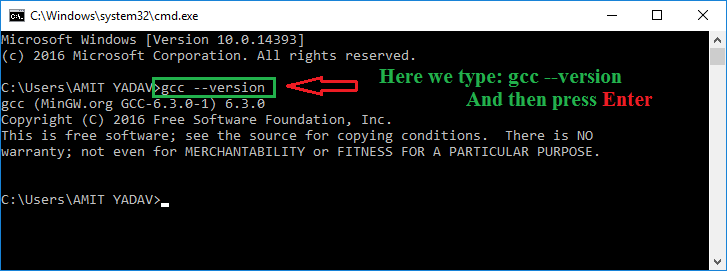
9. If we want to check that the MinGW has been successfully installed in the system: go to the Command Prompt or cmd, write the GCC -version, and press the Enter
Start Coding in the Visual Studio Code Editor
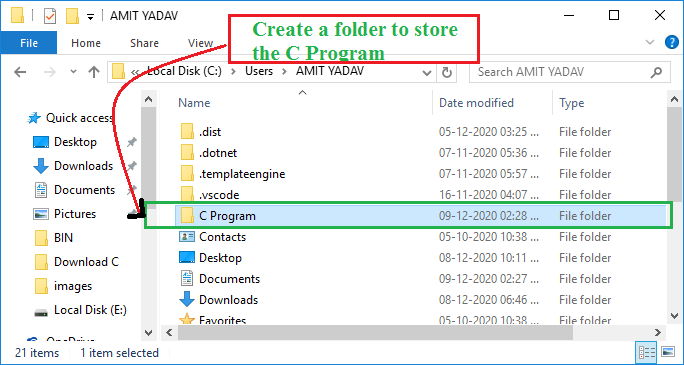
1. Here we created a C Program folder to store all program code. We can create a folder with any name in any directory.
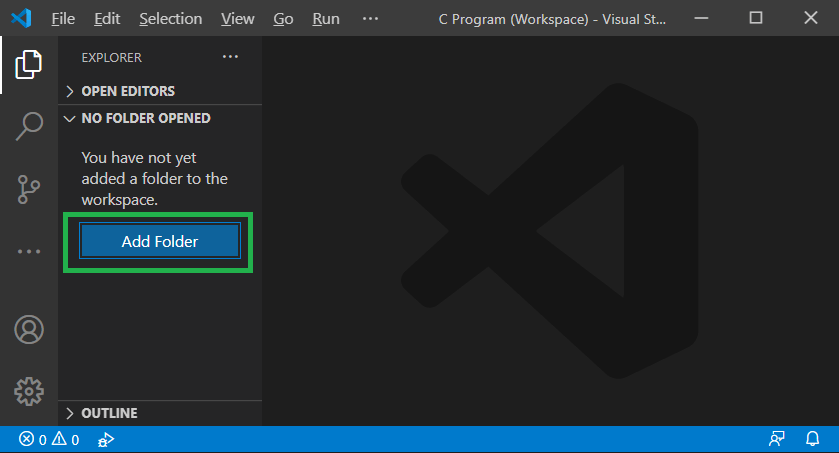
2. Go to the VS Code and click on the Add Folder.
3. As we click on the Add Folder, it shows a popup dialogue box to select the folder to store the program.
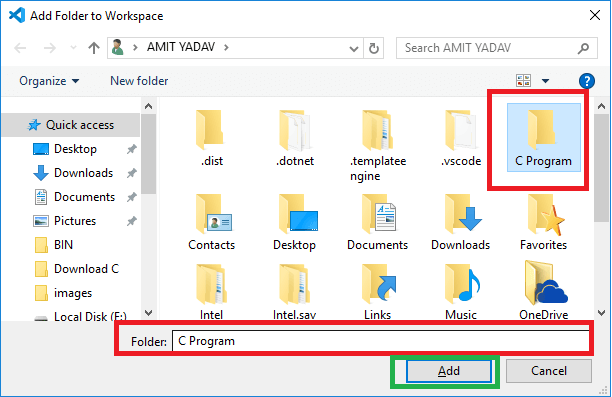
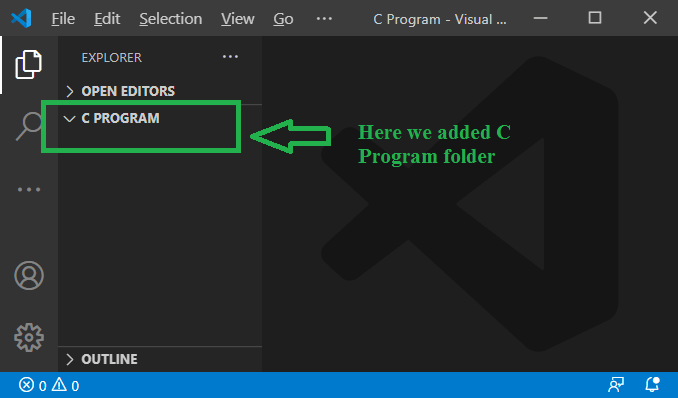
4. After selecting the folder, click on the Add The selected folder appears in the Explorer section, as we have shown below.
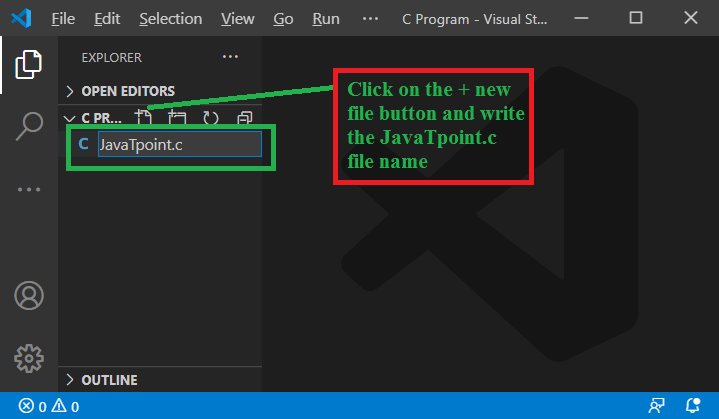
5. Move the mouse over the C PROGRAM folder; it shows a + Click on the button and write the file name as Nicebhawanipatna. c, as shown below.
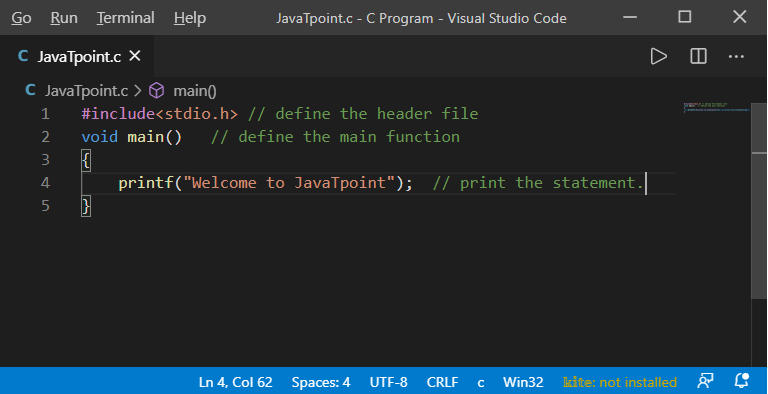
Now write and understand simple C programming in the VS Code editor.
nicebhawanipatna. c
- #include<stdio.h> // define the header file
- void main() // define the main function
- {
- printf(“Welcome to nicebhawanipatnat”); // print the statement.
- }
After writing the code, right-click on the program, as shown below.
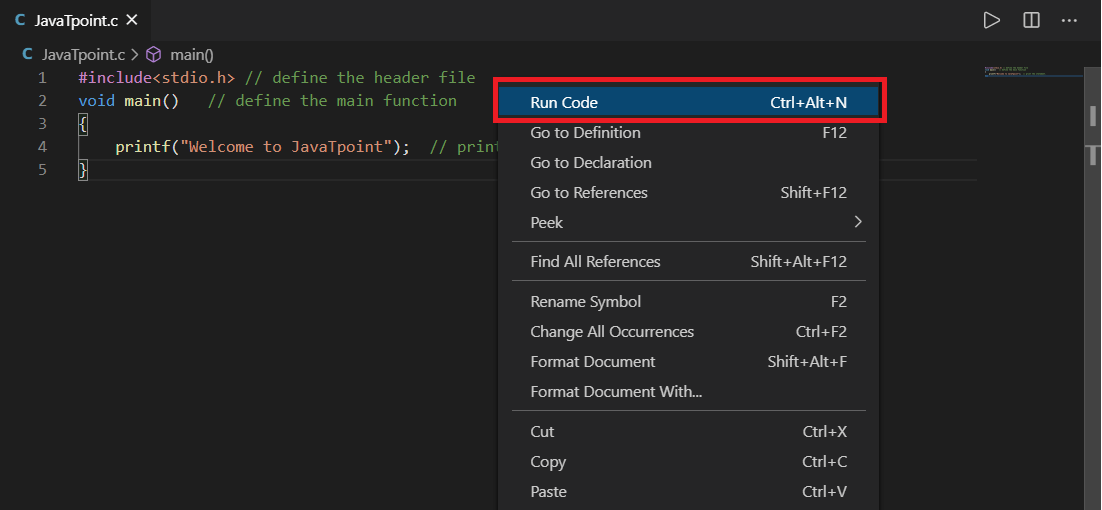
Click on the Run Code option or press Ctrl + Alt + N from the button. It shows the following output.
- Welcome to nicebhawanipatna
Let’s write a program to calculate the area and perimeter of the rectangle in the VS Code editor.
Rectangle. c
- #include<stdio.h> // header files
- #include<conio.h>
- void main()
- { // initialize the local variables.
- int l =5, b=10, ar, pr;
- printf(“Length & Breadth of the rectangle is: %d & %d”,l, b);
- ar = l * b; // calculate area of rectangle.
- pr = 2 * (l + b); // calculate perimeter of rectangle.
- printf(“\n Area of Rectangle is: %d”, ar);
- printf(“\n Perimeter of Rectangle is: %d”, pr);
- }
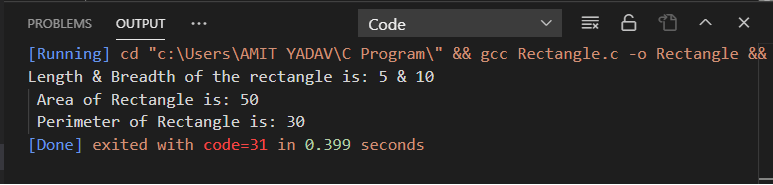
We can click on the Run button or press the Ctrl + Alt + N from the keyboard. It displays the below output.
Let’s write another C program to take input from the user in the Visual Studio Code Editor.
Rectangle2.c
- #include<stdio.h>
- int main()
- { // initialize the local variables.
- int l, b, ar, pr;
- printf(“Enter the length of the rectangle”);
- scanf(“%d”, l); // take input from the user
- printf(“Enter the breadth of the rectangle”);
- scanf(“%d”, b);
- ar = l * b; // calculate the area of rectangle.
- pr = 2 * (l + b); // calculate the perimeter of rectangle.
- printf(“\n Area of Rectangle is: %d”, ar);
- printf(“\n Perimeter of Rectangle is: %d”, pr);
- }
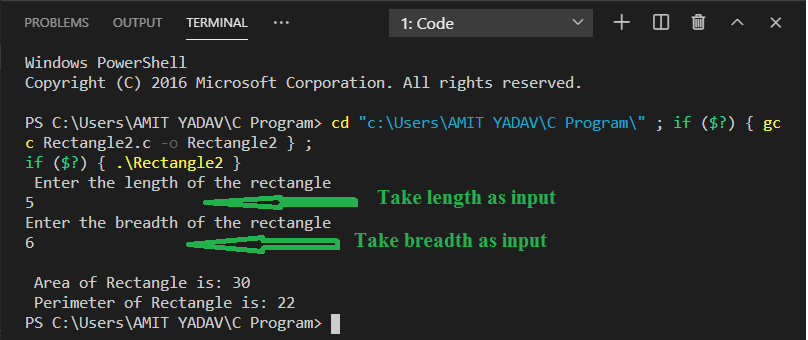
When we click on the Run button or press the Ctrl + Alt + N, it displays the below output.
In the above program, we take length and breadth as input from the keyboard. As the program is compiled, it produces the below statement.

Here Output tab is read-only, and hence we cannot take any input from the user. So, we need to add some steps in the code editor to take user inputs from the console/user.
Following are the steps to take input from the user.
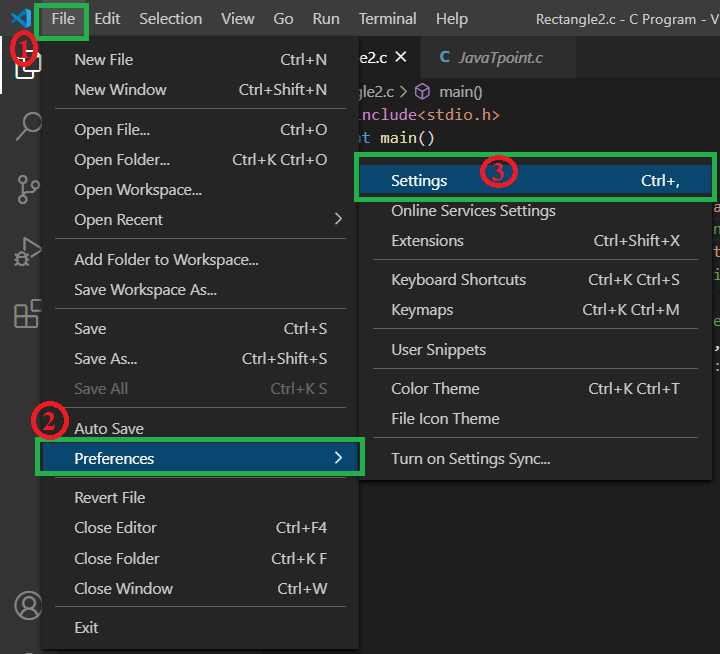
- First of all, we need to stop the background running the c program by pressing the Alt + Ctrl + M from the keyboard.
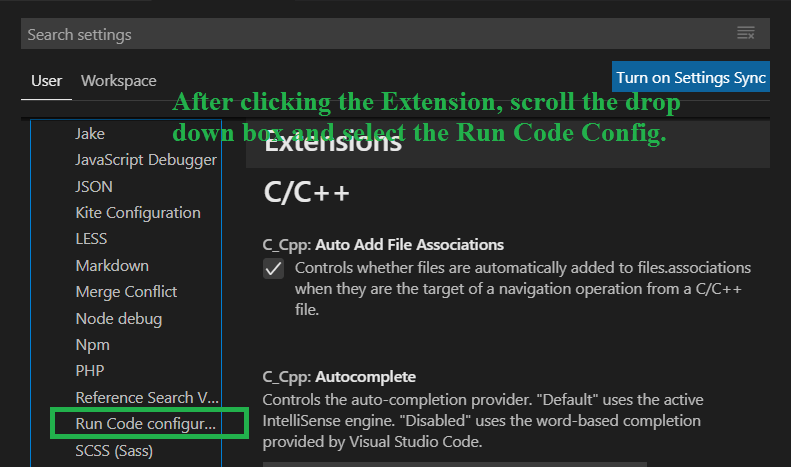
- After stopping the C file, go & click the File button at the top left corner of the Visual Studio Code Editor, and select Settings via Preferences, as shown below image.
- After clicking the Settings, it shows the image below.
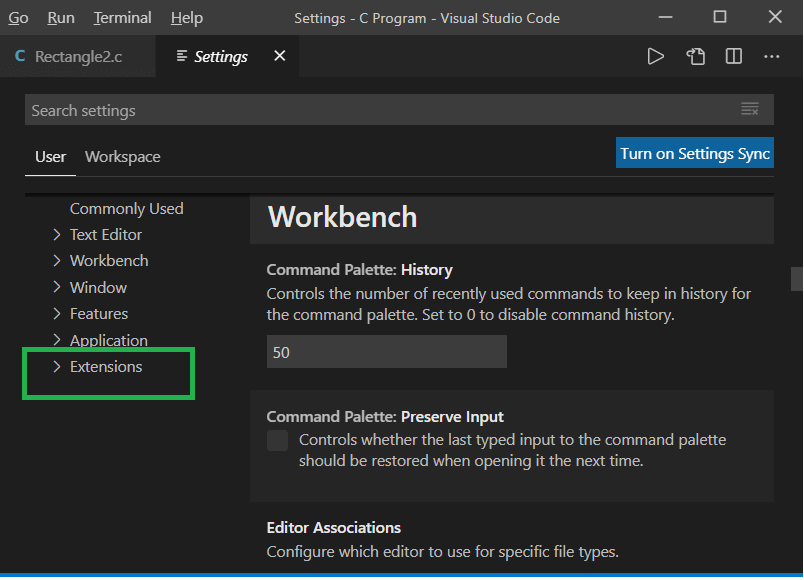
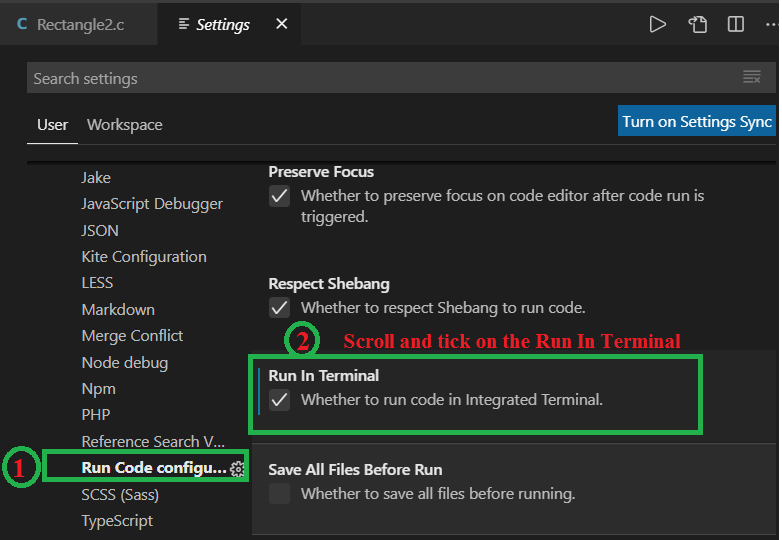
In this image, select the extension button to set the settings for the C Compiler. - Click on the Extension button and scroll the drop-down box to select the Run Code Configuration.
- Now scroll the right-side pane and Tick on the Run In Terminal.
- Go to the c and again execute the program by clicking on the Run, it produces the following results, as shown below.
Program to Display “Hello, World!”
#include <stdio.h>
#include <conio.h>
void main() {
   // printf() displays the string inside quotation
   printf("Hello, World!");
   getch();
}
Output
Hello, World!
Program to Display “YOUR NAME”
#include <stdio.h>
#include <conio.h>
void main() {
   // printf() displays the name inside quotation
   printf("My name is dev.");
   getch();
}
Output
My name is dev.